





Everything You Need to Know to Make Your First Quilt, From Supplies to Final Stitch
Starting something new can feel overwhelming, especially when it involves tools, techniques, and terms you have never used before. Quilting, though, is much more approachable than it might seem. At its heart, quilting is simply sewing pieces of fabric together to create a quilt top, then combining that top with batting and backing to make a finished quilt.
The best part is that you do not have to know every stitch or master every technique before you begin. With a few basic quilting supplies, a simple pattern, and a little guidance, you can make your first quilt while learning as you go. This beginner quilting guide walks you through the process from choosing your fabric to putting the final stitches in your binding.

What Do You Need to Start Quilting?
You do not need an entire sewing room full of tools to make your first quilt. Your basic quilting supplies include quilting cotton fabric, quilt batting, quilting thread, a rotary cutter, a self-healing cutting mat, a quilting ruler, straight pins or fabric clips, an iron and ironing board, and a sewing machine. A seam ripper is also handy to keep nearby because every quilter needs one eventually.
For your first quilt, try choosing three or four coordinating quilting cotton fabrics. Quilting cotton is a great choice for beginners because it is stable, easy to cut and sew, and available in an almost endless variety of colors and prints.
If you are also shopping for your first sewing machine, see our guide, The Best Sewing Machine for Beginners, for more help choosing a machine that fits your needs.

Step 1: Choose a Simple Quilt Pattern and Fabric
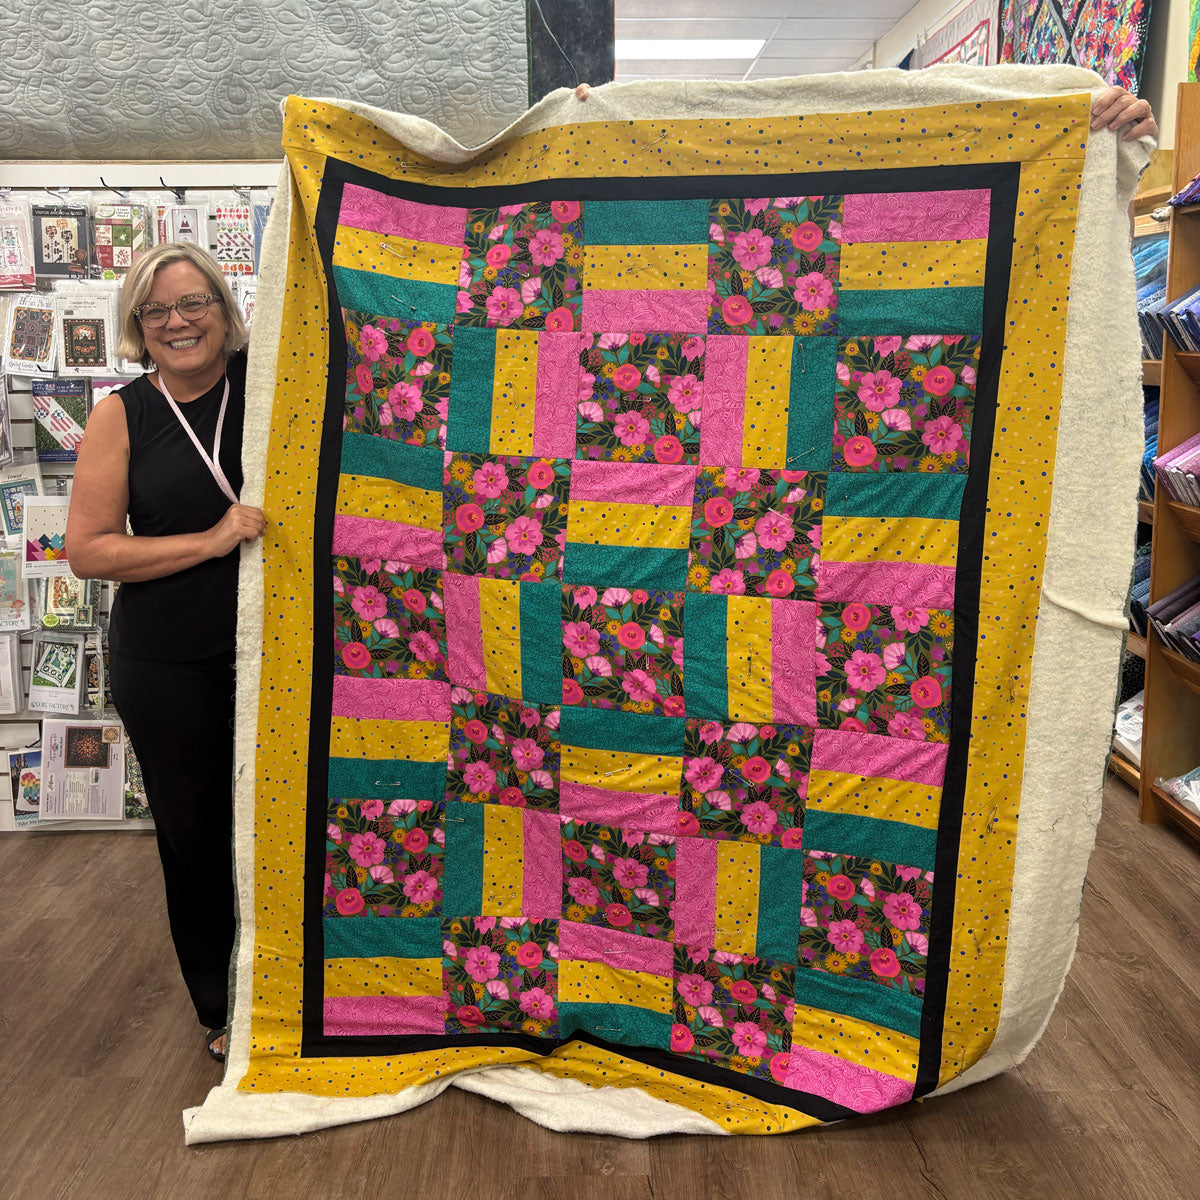
Your first quilt is a great place to keep things simple. Beginner-friendly quilt patterns such as a rail fence or nine patch let you practice the most important quilting skills without adding complicated construction. A rail fence quilt uses strips of fabric sewn into blocks that change direction, while a nine patch is built from blocks containing nine equal squares.
When choosing fabric, look for three or four prints that work well together. One easy approach is to combine a larger print with a medium print and one or two smaller-scale prints. Adding a solid or a fabric that reads almost like a solid can give the eye a place to rest and help the other fabrics shine.
Do not worry about finding the one perfect combination. Part of learning how to quilt is learning what colors, prints, and styles you enjoy putting together.

Step 2: Prepare and Cut Your Fabric
Before you start cutting, decide whether you would like to pre-wash your fabric. If you choose to pre-wash, wash and dry the fabric the same way you expect to care for the finished quilt. Once it is dry, press out the wrinkles so your fabric lies flat before cutting.
Place the fabric on your self-healing cutting mat and use your quilting ruler and rotary cutter to make clean, accurate cuts according to your pattern. Accurate cutting makes the next steps much easier because pieces that begin at the correct size are easier to sew into correctly sized blocks.

Step 3: Arrange Your Quilt Pieces
Before sewing, lay out your pieces so you can see how the quilt will look. A large table, clean floor, or design wall all work well. Step back and look at how the colors and prints are distributed across the quilt.
If one area looks too dark, too busy, or too similar, move a few pieces around until the arrangement feels balanced. This is much easier to do before anything has been sewn together.
Many quilters take a quick photo of their layout with their phone before they begin sewing. That gives you an easy reference if pieces get moved or mixed up while you work.
Step 4: Sew Your Quilt Blocks Together
Now the quilt really begins to take shape. Most quilt patterns use a 1/4-inch seam allowance, which means the stitching line sits 1/4 inch from the raw edge of the fabric. Many sewing machines have a 1/4-inch quilting foot, but you can also use the markings on your machine's throat plate as a guide.
Sew the fabric pieces together according to your pattern, then press the seams after each step. Pressing helps your blocks lie flat, keeps them easier to work with, and makes it easier to line everything up when you begin assembling the quilt top.
Pressing seams to one side can add stability to your patchwork. When working with noticeably light and dark fabrics, pressing toward the darker fabric can also help prevent the darker seam allowance from showing through the lighter fabric.
Step 5: Assemble the Quilt Top
Once your individual quilt blocks are finished, arrange them in their final order and begin sewing them together into rows. After the rows are complete, sew the rows together to create your finished quilt top.
Take time to line up seams where blocks meet and press the quilt top as you go. Crisp corners are satisfying, but your first quilt does not need to be perfect. A slightly mismatched point will not stop your finished quilt from being warm, useful, and completely yours.
The more quilts you make, the easier accurate piecing becomes.

Step 6: Make the Quilt Sandwich
Once your quilt top is finished, it is time to turn it into an actual quilt. This stage is often called making a "quilt sandwich" because you are stacking three layers together.
Begin with your backing fabric positioned right side down. Smooth the quilt batting over the backing, then place your quilt top right side up on top of the batting. Smooth all three layers so they are flat and free from wrinkles.
Secure the layers before quilting so they do not shift while you sew. Safety pins placed throughout the quilt or a quilting basting spray can both be used to hold the quilt sandwich together.

Step 7: Quilt the Layers Together
Quilting is the process of stitching through the quilt top, batting, and backing so all three layers stay together. Your quilting can be incredibly simple or wonderfully elaborate, but beginners do not need to start with complicated designs.
Straight-line quilting is one of the easiest ways to quilt a first project. You can sew parallel lines across the quilt, create a simple grid, or use the seams of your patchwork as guides.
Another beginner-friendly option is stitch in the ditch quilting. With this method, you quilt along the seam lines between pieces or blocks so the quilting stitches blend into the quilt top.
Choose the method that feels manageable with your sewing machine and your particular quilt. The purpose of your first quilt is to learn the process, not prove that you already know everything.

Step 8: Trim and Bind Your Quilt
After the quilting is finished, trim the excess batting and backing from the edges so your quilt is neat and square.
Binding is the strip of fabric that wraps around the raw edges of the quilt and gives it a finished appearance. You can make your own binding or use pre-made binding for your first project. Binding is typically sewn to one side of the quilt, folded around the edge, and then secured on the other side by hand or machine.
That final stretch of binding can feel a little magical. You started with separate pieces of fabric, and suddenly you are holding a finished quilt.

What Should You Quilt Next?
Once you have completed your first quilt, the basic process will feel much more familiar. Your next project is a chance to repeat the skills you just learned while adding something new.
A baby quilt or small throw is a natural next project because the smaller size makes it easier to practice cutting, piecing, quilting, and binding. Table runners and placemats are also wonderful practice projects because you can finish them relatively quickly while experimenting with new fabric combinations or techniques.
As your confidence grows, you might try a memory quilt made with special fabrics or clothing, experiment with appliqué, learn foundation paper piecing, or explore free-motion quilting. There is always another technique waiting for you, but you never have to learn everything at once.
Your First Quilt Does Not Have to Be Perfect
Learning how to start quilting is less about perfection and much more about making that first cut, sewing that first seam, and giving yourself permission to learn.
Every experienced quilter once had a first quilt. They had seams that did not line up, blocks that were not perfectly square, and moments when the seam ripper got a little more use than expected. Those imperfect stitches are part of learning the craft.
With a few supplies, a beginner-friendly pattern, and a willingness to try, you can create something beautiful, useful, and entirely your own. Before long, that stack of fabric you started with will be a finished quilt you can actually snuggle under, and you will already be thinking about what you want to make next.
Beginner Quilting FAQs
Is quilting hard for beginners?
What is the easiest quilt pattern for a beginner?
Do I need a special sewing machine to start quilting?
What is the best fabric for a first quilt?
Do I have to quilt my quilt myself?
I’m Angela- Co-host of the Fons & Porter’s Love of Quilting PBS show. APQS Long arm Dealer and Educator. Triplet Momma. Designer. Thread Bimbo.


Leave a Reply