


Case Study: Karen's Log Cabin at Heart Quilt
This is a multi part post showing my design process for a high end custom quilt. This is part one. You can see the end result of the design work below by clicking here. It won first place! Karen is one of my favorite customers. She must have extra hours in her day because she pieces more tops than there are hours to quilt in a day. I've done many quilts for her in the past but this one is, I think, the biggest one she's ever brought to me. It is BIG and totally scrappy! I love it! If you saw my post on how to create a design wall for your sewing room, you've already seen her quilt top. 
I thought you might enjoy watching the design process for this quilt as I determine what I want to quilt on it. Karen graciously gave me free reign to do any kind of custom quilting I want and she is planning on entering it into a local show. That always makes my heart rate rise a little when the customer says they plan on having it judged. Of course, I always want my customers happy with quilts but then I also want them to get a nice shiny ribbon too. The first thing I did was take some photos so I can bring them into my computer to audition designs.This quilt is so big that I couldn't get a full photo of it so I folded it for the picture. If you have a design wall in your studio, that is a great place to put up a quilt top in order to do a little "Stand and Stare" contemplation with it. Anyway, once I have the photo in my computer I'll open it up in an application that will allow me to draw on it. I like to use Photoshop but it is pretty expensive. There are lots of other drawing/photo applications out there and you likely have one that shipped with your computer. Search your computer for something called "Paint" and see what pops up. I like to use an application that has layers. Layers are like transparent papers I can lay on top of the photo, draw on and then hide that doodle so I can draw something different on a different layer. I keep doing this- draw/hide/new layer, draw/hide/new layer- until I can weed down to what designs are speaking to me. (click on any of the photos to enlarge them)  In this case I started playing with the natural diamonds the inner log cabin blocks created. To do this I drew straight lines with the pen tool in red. I then played around with doing large cross-hatching to create an argyle effect.

 Then I played around with feathers in each of the blocks.

I like it but I was still looking for a bit more zing. I have a pretty incredible book that was recommended to me by Beth Schillig. It has over 5000 line drawings of flowers and plants and most of them would make incredible block designs or applique designs. The best part is that the book included a CD with a jpg file of each of the designs! Here's one design I thought might look nice. I opened up the design's file and used the magic tool in Photoshop to select all of the black line drawing of the file as one selection and then I turned it white so I could see it better on my photo. I plopped it onto one of the blocks.

This was where I ran into an issue with the photo I took. Do you see how I had to take the photo standing off to the side? That meant that the blocks were all going to be slightly skewed in the photo which makes it hard to lay a pattern over the photo since I wouldn't be able to directly match the skew I'd made with my camera. Instead, I decided to do a quick image search on Google for "courthouse steps quilt". (Note: if you just Google "courthouse steps" you'll get a ton of images of brides on actual courthouse steps. Apparently that is a thing now- who knew?). Anyway, don't forget that Google allows you to search only images and you can even search just for "clip art" or just for "line drawings" to help narrow down your choices. Learn how to use Google for more than simple searches on the main page's box. It is a great quilting tool! :)

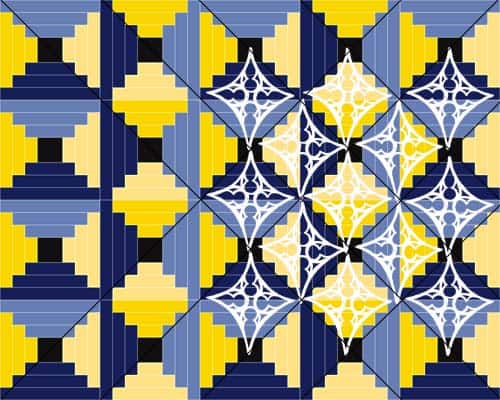
Here's that same block design over the courthouse steps clip art I found. I've also placed some of the other designs from the book that I thought might look nice and still give me the curvy effect I was trying to introduce on the courthouse steps block. But they still weren't doing it for me. Then I found this:

Don't you LOVE it? It had everything I was looking for. It gave me curves and movement and I placed some straight lines to break the blocks up into new on point settings. I finally thought I'd found the answer or at least the direction I wanted to go.
Next up- refining the voice and honing in on the design motif.
This is a series of posts walking through the design process for high end custom quilting on this courthouse steps quilt made by Karen F. Come back in a few days for the next look at the process.
I’m Angela- Co-host of the Fons & Porter’s Love of Quilting PBS show. APQS Long arm Dealer and Educator. Triplet Momma. Designer. Thread Bimbo.


Leave a Reply