


A Neighborhood of Houses with Tracey's Quilt
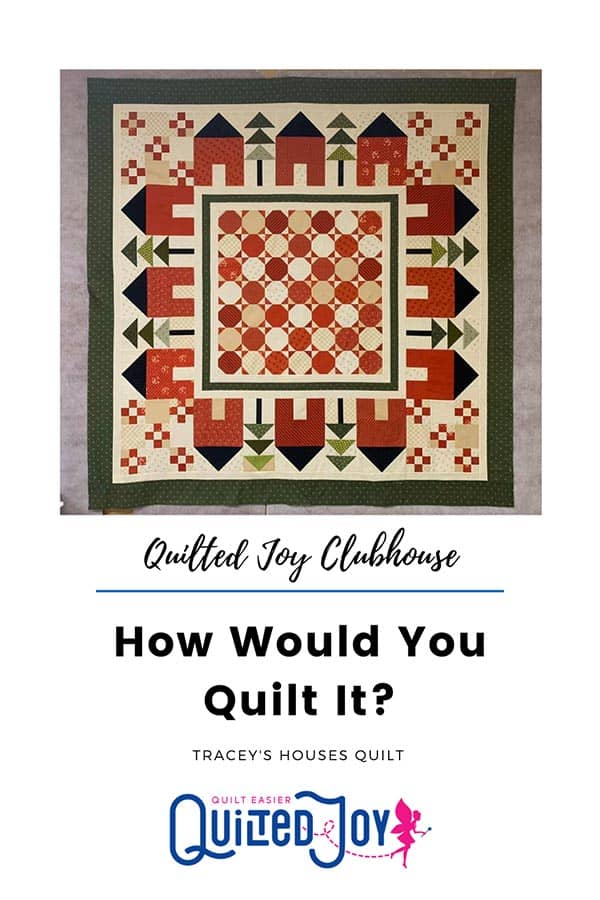
In August of 2020, I was able to show everyone watching the Quilted Joy Clubhouse how I would quilt Tracey’s House Quilt. She had this Neighborhood of Houses top which she made to be a raffle quilt for her guild. Guilds can be a great way to gather with others with the same interests and learn and grow together. They can not only be fun, but you can find support and encouragement there as well. I cannot recommend them enough. So this house quilt just makes me think of all her guild members sitting in their homes helping each other at a distance, especially during these difficult times.
First, the Neighborhood of Houses
So the houses, though not strictly in the center, are definitely the center of the design. So what we put in them is critical. Originally, I thought that we could put siding or bricks on each house. Or maybe even windows or some other feature like that. But that would have taken a lot of time. So what could I do in a reasonable amount of time and still do justice to these houses.

I decided on drawing a heart above each door with a diamond in the door. I would use refrigerator coil to travel up the side until I reached the point to add the heart and diamond then on to the roof where a simple swag and tear drop would complete the roof and back down the other side. It’s simple, but pretty and brings to mind the love in each house for each other.
Next, the Corner Nine Patches
Next I wanted to sort out the corners. This inner border is both an opportunity and a challenge. It is the same color as the scrappy background of the houses, so it causes the nine patches in the corner to sort of float. One of the ways to treat those nine patches would be to treat them as one block, but because of the border, it would look off center.

So instead, I draw in that inner border to the background. I’d put a heart, to tie into the houses, into each of the nine patches and then meander around and through all the cream background fabric. This would include around the houses and the trees. Not only does it fill in the background, but it gives me the opportunity to travel between the different elements. The key to filler like this is to be mindful of my exits. Don’t fill in everything so solid as you pass that you “paint yourself into a corner.”
While I’m at it, I’ll also quilt the trees. Working up one side and down the other I put in some curved lines for each bough and straight down the trunk. At the base of the trunk is an opportunity to connect to the next house. Having a path to connect to each element means fewer starts and stops to do.
Don't forget the center!
Now we can tackle the inside. The border around the center blocks is a great place for some feathers. You don’t have to treat the three inner borders as individuals. I’m going to ignore the seam and just put a feather through all three like they were one piece. First we start with the keystone feathers in the shape of a figure eight. After I’ve chalked out the spines I can start quilting in my feathers up one side and travel back down the spine to do the other. The mitered corner is my boundary for the tip of the spine, no marking necessary.
For the snowballs in the center, I’m going to do something pretty traditional. We’re going to use crosshatching. The path I take to put this crosshatching in is more complicated to explain than to show. We have a downloadable worksheet and a video that illustrates this process very well. In a nutshell, you draw a rectangle and then travel to the next point to draw another rectangle. It is a very efficient way to do this traditional design.

Finally we come to our outer border. Here I’m going to put in some beadboard. I’ll put a heart in the corners to tie into the houses a little and then travel along the outside edge of the quilt to then drop in a double line. I’d mark out where I want these to go of course to keep them evenly spaced.
How Tracey did it
And there you have it. This is how I would quilt Tracey’s House quilt if it were mine. Now what Tracey has chosen to do is slightly different. She decided to do much of what I suggested, but instead decided not to put any hearts.

She also replaced the fillers I suggested for ones of her own. I especially liked the clamshells in the houses. All of her choices turned out really well and she has completed a quilt she can be proud of. Good job, Tracey!


I’m Angela- Co-host of the Fons & Porter’s Love of Quilting PBS show. APQS Long arm Dealer and Educator. Triplet Momma. Designer. Thread Bimbo.

Leave a Reply