How to Quilt Garden Gate Feathers + Free Practice Worksheet!
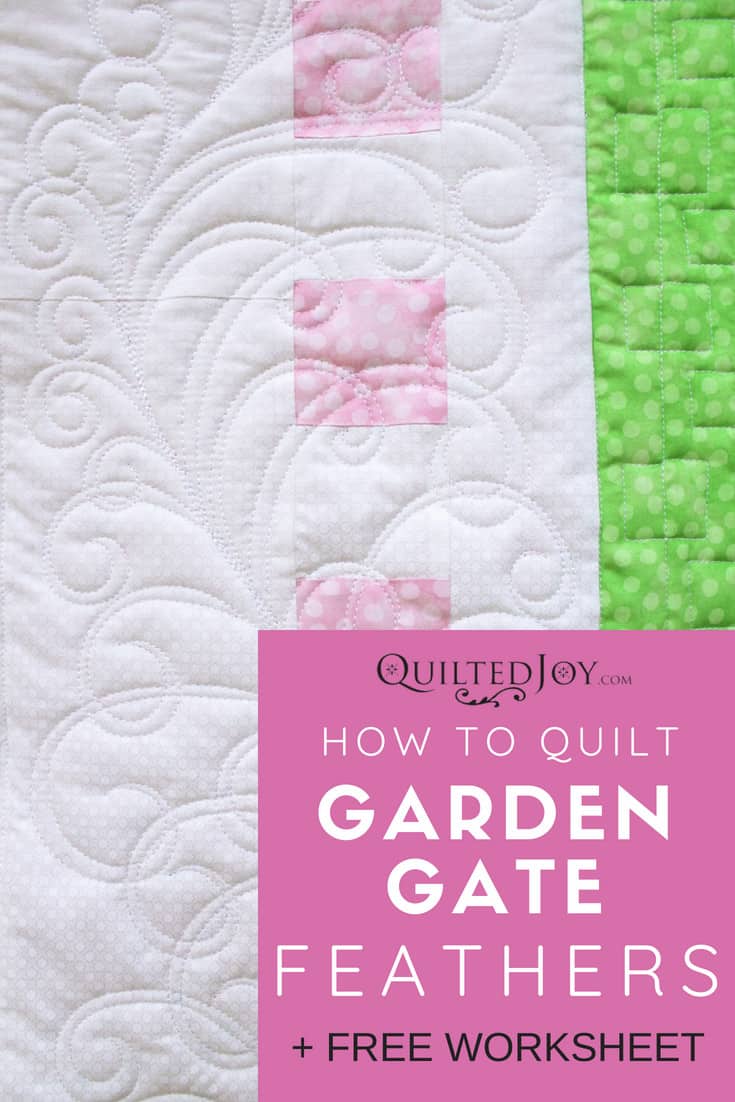
A couple weeks ago you guys got a peek at Pam's adorable Paper Doll Quilt for her first granddaughter. I had so much fun quilting this quilt for Pam because it's just so dang cute! There were so many opportunities for me to try lots of different quilting designs. I really got to play with my Millie longarm machine and I think we all need that sometimes. In addition to lots of fun background fillers, I also quilted a curling and undulating feather border that I'm now in love with. I wanted to share a closer look at this sweet little quilt designed by Amy Bradley and show you how to quilt the Garden Gate feathers in the border!
I love finding quilty inspiration in the most unusual places. Like the time I was inspired by the window designs at the Opryland Hotel. It's amazing where inspiration strikes! The Garden Gate feathers are inspired by decorative wrought iron. I was specifically inspired by the way the iron curls and swirls. They're so intricate, elegant, and delicate but still very whimsical and fun. I wanted to create a beautiful curling feather.
The basic shape of the garden gate feather is just the common hook. You'll see hooks and curls in lots of custom quilting motifs. Your hooks and curls will have a different look and feel depending on if you cross over your lines. For these feathers I wanted a more whimsical feel, so the curls don't cross over themselves. If you're needing a little guidance on hooks and curls, take a look at this video tutorial about the anatomy of a quilting curl.
These are spineless feathers, so you'll want to mark a spine but we won't quilt it. I marked my spines on Pam's quilt with my favorite marker, the Marvy air erasable marker. You'll start your feather plume at the base of your marked spine and swoop up to make a skinny hook. Really focus on tucking that end point into the center of your hook.
Echo back down the hook to the spine. Now you can quilt one or two more hooks on the same side of the spine. Then flip over to the south side of the spine and quilt two or three more hooks and cross back to the north side.
As you quilt these lovely hooks you will occasionally cross over one of the feather plumes you've already stitched. That's what makes the Garden Gate feathers so easy and forgiving! You don't need to worry about keeping your feather plumes symmetrical and uniform. If you need to, you can even cross over your lines and fill in any empty spaces. There aren't any quilt police in your studio so you can make your own rules! :)
Are you ready to quilt your own Garden Gate Feathers? Fill out the form below to receive a Garden Gate Feather Worksheet, plus you'll add a little quilt fairy magic to your inbox too!
I quilted the feathers all the way around the border of Pam's quilt. Over on the APQS blog, I wrote about how to quilt the feathers and I shared my technique for planning my feather's path around the borders. Click here to see that post and learn more about feathers in a border.
Now that you've seen how to quilt the Garden Gate Feather, take a look at some of the other quilting elements I added to the quilt. I had lots of fun coming up with different linear fillers for each of the paper doll's outfits.
I wanted a different filler in each block, so I looked to the outfit for inspiration. Like the raindrops behind the rain coat and butterflies behind the butterfly costume.
I even added a little Judi Madsen inspired filler behind Caroline's name. I think my favorite block is the pajamas. Her kitty and bunny slippers are made with fuzzy fleece fabric!
This quilt was so much fun to quilt and those Garden Gate Feathers were such a sweet addition. Don't forget to download your free Garden Gate Feather worksheet by clicking here. I'd love to see your version of the feather! You can share them with me on the Quilted Joy Facebook page or you can tag me on Instagram.

I’m Angela- Co-host of the Fons & Porter’s Love of Quilting PBS show. APQS Long arm Dealer and Educator. Triplet Momma. Designer. Thread Bimbo.




Leave a Reply