Installing Leader Grips on APQS Millennium
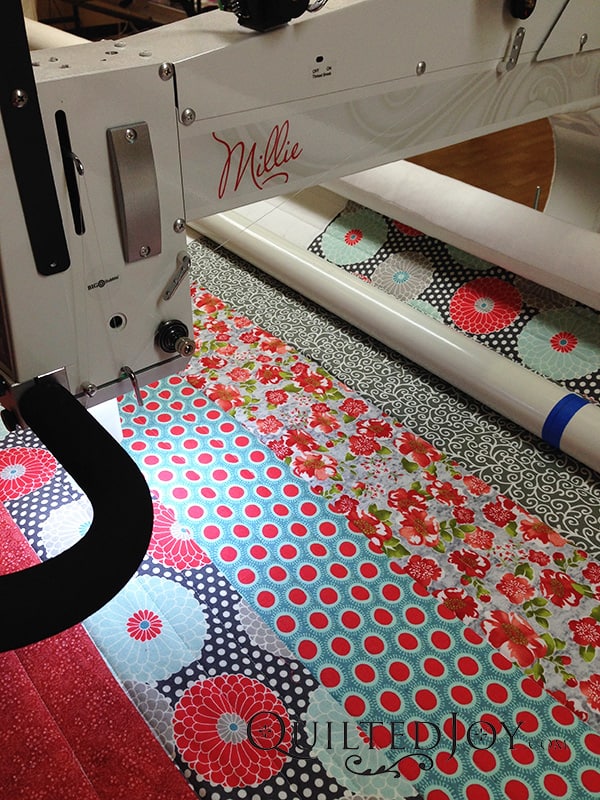
One of the things I highly recommend adding to your longarm machine is Leader Grips which is a rod snapping system that makes it so FAST to load a quilt onto a long arm quilting machine. On my previous Millennium I used Red Snappers but this time I decided to go with Leader Grips instead. I found that Red Snappers were too stiff for my hands but Leader Grips don't make my hands hurt when using them.
I've got written instruction below but my friend Tracey in Canada at Whirls and Swirls Quilting has done a great video on how to make the casings on your canvas leaders for the installation of Leader Grips. BTW- I have these in my online shop if you are interested.
Wasn't that a great video?
Here's some written instructions if you need it. I do a couple of things slightly differently but I love Tracey's method.
First, we need to make a pocket in the canvas leaders for the tubing to slide inside. I started by pining the leaders to each other using T-pins but any kind of sturdy pin will work. While they were pinned together I made a center mark on both leaders using a fine tipped sharpie. Now my leaders have their center marks! The next step was to make straight lines using my channel locks on each side of where the leaders are pinned. I put in a bright lime green thread and, using my channel locks on my machine, I ran a line of stitching down the canvas leaders about 1.5" or so away from the edge that is pinned to the other leader.


Then I measured 3/4" away from that first line and turned on my channel locks again so I could run another line of stitching down the leaders. I did this on both the backing leader and the take up leader as shown in the photo up above.
Now I've made the straight lines I'll be using as my reference lines. I changed my thread to a kaki color that will blend well with the canvas. I unpined the two leaders from each other and folded the canvas back so one of the lines is along the fold edge and the other line is where I'll be stitching on top for the new pocket's seam. I used my iron to press against the bar to set the fold and pined the fold to keep everything in place. Here I decided to use the straight line of stitching that was furthest away from the edge of my leader as the fold line and the straight line that was closest to the edge of my leaders as the new guideline for the stitches I'll be putting in to actually make the pocket. You may choose the opposite.

This next part may be easier with a buddy but I just used my clamps. I've got Kaki thread in the machine and all I need to do is run a line of stitching on that bright green straight line to make my pocket using my APQS Millennium. I kept the stitches just outside the green stitching line so as to not impede on the space I need for the pocket as I will be scooting the rods through the pocket in a minute. Work your way down the canvas carefully. I didn't use my channel locks for this part. I just held the canvas with my left hand and moved the machine with my right.

Do this on both leaders so now you'll have a pocket in the takeup bar's leader and the belly bar's leader. When you get to the edges you'll have to move the canvas over a bit so you can stitch all the way to the edge of the leaders. Since you are using kaki thread your wobbles and bobbles won't be noticeable.
Now we can slide in one of the pieces of the Leader Grip tubing. In the packet with your LeaderGrips you'll get some shrink wrap tape you are supposed to hit with a hair dryer so it grips the junction where two of the tubes comes together. There is a sample in the packaging. I tried this and didn't feel it gave me the support and rigidity I was looking for.

Instead I went to the hardware store and got a packet of double headed dowel screws. They are dowel screws and work great. I used three per leader on my 12' table. If you have a different size table you may need more or less of these screws. Slide one of the leadergrip tubes into your new pocket and when about 6" are hanging out, grab the next tube and put the the dowel screw in. Then start screwing the two rods together. You may have to hold the screw with some pliers to be sure that half of the screw is in one tube and the other half is in the other tube. Anyway, this junction is far better for me than the shrink wrap as I slide these tubes out of the pocket when I teach to show multiple ways of loading quilts. The shrink wrap provided with the Leadergrips wouldn't put up with that movement over time. The dowel screws, however, certainly will.

I’m Angela- Co-host of the Fons & Porter’s Love of Quilting PBS show. APQS Long arm Dealer and Educator. Triplet Momma. Designer. Thread Bimbo.



Leave a Reply