


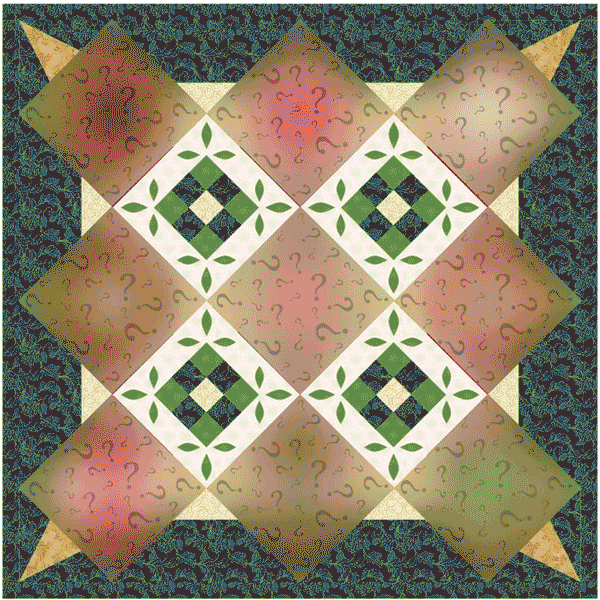
Claudia Blossoms with her Hometown Blooms
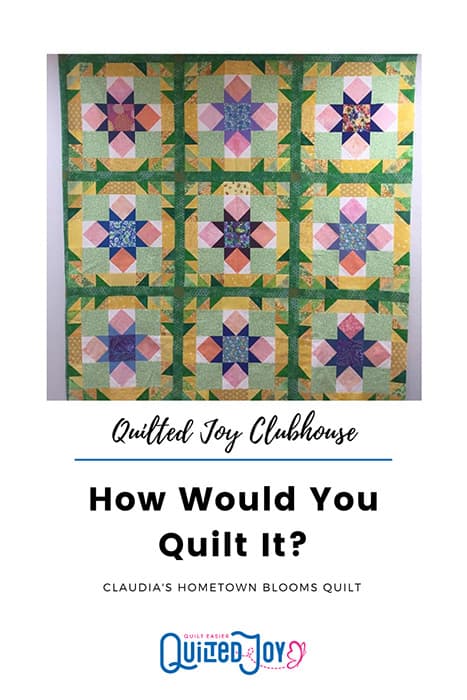
In June, I chose a quilt for our “How I would Quilt it” segment of the Quilted Joy Clubhouse that I was very familiar with. Hometown Blooms is my version of “Sangria" by Diane Tomlinson. Claudia now has joined me in picking her own colors and making yet another version of this quilt. Don’t you just love that? With the simple shift of some colors, you can create an entirely different quilt with the same pattern. I quilted mine with an edge to edge design because the fabrics I used would not have shown the quilting very well. But Claudia chose differently. This is how I would quilt Claudia's Hometown Blooms Quilt!
I Started with the Secondary Design
The first thing that jumped out to me was the secondary block that comes together in the corners of the blocks and sashings. Can you see the flying geese behind the sashing? I thought they should have noses. And this idea led me to the idea of playing with these shapes a bit more.

Often, I worry about the path to take after I figure out what I want to do, but this one became clear to me a bit sooner. If I trace the geese in a figure eight type direction, I can get all three. But I wanted them to pop a little more than that so I used stippling to fill in the center square and the outside corners. To do this in a continuous line without additional starts and stops, we’d have to fill it in as we outlined the geese.
Now the Main Block of Hometown Blooms
Now we need to address the main block. To make things easy, I like to find ways to travel between quilted areas without having to start and stop. So I look for “Magic Portals” that will allow me to drop in and quilt a new area before returning to what I was doing before.

So I create a little chevron in these rectangles around the block. I know what I want to put in these squares are the feathers I was discussing earlier in the meeting. But first I have to get there. So I put a leaf shape through the center of the square.
Finish with some feathers and crosshatching
So now I can jump to the corner, put a little leaf, and another in its opposite corner. This is a good place to start my feather in the square, going down one side and coming back to the same place I started. Now I can work my way around the square. I want to put cross hatching in these corner squares which means rulers.

It is always a good idea to stitch in the ditch to ensure that the quilt doesn’t get pushed askew when I use my rulers. The piecing gives us a great place to put the crosshatching, so no pre-marking is necessary. Once I make it all the way around, I need to be sure to finish that first leaf that I had only started and voila! We’re done.
I really love how the crosshatching in the corners really gives Hometown Blooms some solid structure. And the leafy design looks great with the fabrics Claudia has chosen. Of course you don’t have to quilt it like I have it designed. Take what you like, and add your own flare when you can. This is just what I would do, if this were my quilt.
So how did Claudia choose to quilt her Hometown Blooms quilt? She decided to follow a lot of my suggestions! She said the biggest change was the feather design in the center blocks. She chose a slightly different feather style. Doesn't the finished quilt look beautiful? I especially love the way she staged it in her garden for the photoshoot!


If you are interested in learning more about cross hatching we have a learning center with a whole series of articles about rulers and crosshatching. When you are done practicing, post it and tag us on Instagram or Facebook. We’d love to see what you have been working one!
I’m Angela- Co-host of the Fons & Porter’s Love of Quilting PBS show. APQS Long arm Dealer and Educator. Triplet Momma. Designer. Thread Bimbo.

Leave a Reply